
Thursday, July 21, 2016
Friday, June 10, 2016
New Garmin Instrument
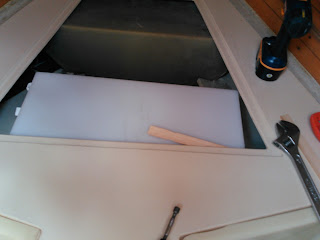
I replaced one of the older Nexus instruments onboard which can't be easily read. The Nexus instrument line was bought by Garmin and they have developed a new series of sealed instruments. To use the new instrument which uses NMEA2000 you have to install a GND10 converter that converts Nexus bus traffic to NMEA2000. To get the NMEA2000 bus to receive the Nexus sensor data you have to configure the GND10 with a laptop running the GND10 driver and Nexus Race software, both available for free download at Garmin website. I mounted the GND10 and most of the NMEA2000 backbone on a scrap of Starboard.
Here is a block diagram of the new subsystem.


 The GNX20 came with a power cable, two NMEA2000 tees, terminator set and a NMEA2000 3 meter drop cable.
I installed the tee for the GNX20 below the instrument cluster on port side quarter berth ceiling. The tee bus port connects with a longer cable supplied in the starter kit and the short drop cable connects the instrument to the nearby tee. The terminator is installed on this tee too.
The next break through came when I learned that the GND 10 is configured at the factory to be the NMEA2000 bus source for all data on the Nexus bus inhibiting SOG, COG, depth etc. You need a PC with the GND 10 driver loaded as well as Nexus Race software to do the configuration. See this helpful document
https://www.benns.se/pub_docs/files/GND10-info_en_ver2.pdf
for instructions on how to do this.
As stated earlier you must download the GDN10 driver and Nexus Race software from Garmin onto a laptop, get them running and then go to the Tools menu within the Nexus race software. The GND10 comes with a USB cable - don't lose it. This all happened without pain and suffering. Starting with the tools button work with the NXR System Configuration screen to click on the GND10 N2k gateway which brings up a "GND10 N2k gateway - Setup" screen. I had all my sensors on the Nexus bus so I un-clicked all the options: log, wind, depth, navigation, compass, and position and hit Apply.
This configuration allows most of my Nexus sensors to be seen on the NMEA2000 at the GNX20 instrument. Before the reconfiguration I had conflict preventing COG and depth from being seen on the GNX20.
Update: I've since learned that the GND10 is programmed to be the only source for SOG making it impossible to display SOG from the Nexus bus. I just use the GNX20 to display depth now.
Here is a block diagram of the new subsystem.

The GND10 mounted on the Starboard is shown below.


Here are a few photos of the GNX20. You will need a 3 1/2 inch hole saw to make the installation cut out. I had to make a hole for the NMEA2000 cable into the cabin too.


I installed the tee for the GNX20 below the instrument cluster on port side quarter berth ceiling. The tee bus port connects with a longer cable supplied in the starter kit and the short drop cable connects the instrument to the nearby tee. The terminator is installed on this tee too.
The next break through came when I learned that the GND 10 is configured at the factory to be the NMEA2000 bus source for all data on the Nexus bus inhibiting SOG, COG, depth etc. You need a PC with the GND 10 driver loaded as well as Nexus Race software to do the configuration. See this helpful document
https://www.benns.se/pub_docs/files/GND10-info_en_ver2.pdf
for instructions on how to do this.
As stated earlier you must download the GDN10 driver and Nexus Race software from Garmin onto a laptop, get them running and then go to the Tools menu within the Nexus race software. The GND10 comes with a USB cable - don't lose it. This all happened without pain and suffering. Starting with the tools button work with the NXR System Configuration screen to click on the GND10 N2k gateway which brings up a "GND10 N2k gateway - Setup" screen. I had all my sensors on the Nexus bus so I un-clicked all the options: log, wind, depth, navigation, compass, and position and hit Apply.
This configuration allows most of my Nexus sensors to be seen on the NMEA2000 at the GNX20 instrument. Before the reconfiguration I had conflict preventing COG and depth from being seen on the GNX20.
Update: I've since learned that the GND10 is programmed to be the only source for SOG making it impossible to display SOG from the Nexus bus. I just use the GNX20 to display depth now.
Monday, May 23, 2016

Monday, March 21, 2016
Replaced Fresh water hoses
Today I replaced the fresh water hoses to the foot pumps and the faucets. This required about 11 +/- feet of 1/2 ID water hose. The hoses were original and pretty ugly inside. At the same time I flushed out the water tank with water and a bit of bleach. To get the new hoses on to the tee fitting I had to heat them up gently with the heat gun, very tight fit even with heat. The aft bilge sump section was not draining into the forward section where the bilge pump sits. There was crud in the weep hole, all good now. At least the bilge alarm and bilge pump work still.


After filling the water tank I found moisture under the galley foot pump. Probably leaking for 25 years.
Friday, March 4, 2016
Replacing Fuel Gauge
Today I replace the fuel gauge that had gone cloudy. A Moeller P/N 35751-10 fit perfectly in the existing hole. To get to the two inner mounting screws you'll need a right angle phillips screwdriver. Apparently I could have bought just the dial part. It is magnetic.


Wednesday, March 2, 2016
Fresh water toilet feed tank installation
Today I tried to complete the installation of a 13 gallon toilet fresh water feed tank but ran into leaks at the y-valve on both lower ports.


The new tank goes into the v-birth area just behind the holding tank.
Here is the tank installed:

I used a Todd 13 gallon water tank. On the port side of the tank there are two 1 1/2 inch and two 1/2 inch threaded holes. You can see the vent in the upper 1/2 opening and a 1 1/2 inch plug used to fill the tank.
Looking down the port side of the tank at the bottom is the 1/2 right angle fitting that supplies the head. There is a 1 1/2 inch pipe plug down there too. I had to install the right angle fitting and the 3/4 hose before installing the tank because it is too tight to work. The tank is supported along the lower aft edge by a 1 X 2 screwed to a bulkhead that runs athwart ship. It is blocked by a 1 X 3 that is screwed into block glued to the hull.


Subscribe to:
Posts (Atom)